HowTo: Deploy and Distribute a wxPython App with Briefcase

[color=]THIS POST IS IN WORK - PLEASE DO NOT FOLLOW THE GUIDELINE YET[/color]

Hi,

in here I am going to write about a HowTo Deploy and Distribute a wxPython App with Briefcase because so far I could not find any blog post or wiki page (if so, please send a link to this topic and I will add it in the first post!).

This HowTo shall be understandable by Python Newbies and thus this HowTo is done with step-by-step instructions.

First, I just want to cover Python version 3. This is because for older Python versions I would suggest the existing tools py2exe, py2app or other tools you will find in the wxpython wiki - Creating Standalone Executables.

What is Briefcase?
Briefcase is part of the BeeWare python package, which slogan is Write once. Deploy everywhere.

According to the website, Briefcase

is a tool for converting a Python project into a standalone native application. You can package projects for:

  • Mac
  • Windows
  • Linux
  • iPhone/iPad
  • Android

However, wxPython supports the operation systems Mac, Windows and Linux - thus I will just cover these platforms.

Briefcase vs. Pyinstaller
Briefcase is a packaging tool, this means you specify the Python packages and your source code and Briefcase takes the packages with pip and your source code and bundles it to a platform native installer (in Windows it is a .msi-file). So basically everything you install in your Python environment setup is also done by Briefcase later on. Note that briefcase is using pip - so do not mess up a python environment with other distribution platforms like anaconda.
The difference to Pyinstaller is that Pyinstaller tries to freeze your current Python Environment. You have to specify hooks so that pyinstaller gets all the files your application needs.
More information about the difference between Briefcase and Pyinstaller is found here:

If you want to have support for Android and iPhone look for other GUI libraries like Toga (BeeWare’s GUI), PySide/PyQt or Kivy.

Windows
Install Environment & Briefcase
A good practice is to create a virtual environment. In this case I will use Python’s native package: venv

We will create this environment in your windows home directory with cmd.exe (python must be available in the system variables):
python -m venv %userprofile%/wxpython_env

We are going to activate the environment with cmd.exe:
cd %userprofile%/wxpython_env/scripts
activate

Now we are going to install packages which are needed for our Simple Test-GUI.
pip install numpy==1.21.2
pip install wxpython==4.1.1
pip install opencv-python==4.5.1.48
pip install beeware==0.3.0

Setup a Briefcase project
Before we write python code we need to initialize a briefcase project, thus we are typing in cmd.exe:
briefcase new

From now we have to go through the set up of briefcase. Note that the information you are going to type in is used for the package you want to deploy.
The following is an example only the last setup (GUI Framework) is important for our HowTo:
Formal Name [Hello World]: wxWebcam
App Name [wxwebcam]: wxWebcam
Bundle Identifier [com.example]: org.wxpython
Project Name [wxWebcam]: wxPython
Description [My first application]: A small application to look at yourself and take an image!
Author [Jane Developer]: Rune Monzel
Author's Email [rune@wxpython.org]: thisisnotmy@email.com
Application URL [https://wxpython.org/wxWebcam]: https://wxpython.org/
Project License [1]: 1

The GUI Frameworks must be None!
GUI Framework [1]: 3

Now we have set up briefcase. A new briefcase folder have been done in %userprofile%/wxpython_env/scripts/wxwebcam. Here we will find the folder src and four other files:

  • pyproject.toml - in here we set up the build process of briefcase. It is the most important file in briefcase. See next chapter on how to setup the pyproject.toml file.
  • LICENSE - in the example above we choosed the MIT License - you should care about Licensing
  • README.rst - in here you should write your project description - it is not visible in the deployed package
  • .gitignore - usefull .gitignore file to suppress the build / output of briefcase which should not be commited to git

In %userprofile%/wxpython_env/scripts/wxwebcam/src/wxWebcam folder we see the following files:

  • folder resources with .icns-, .ico- and .png-files
  • __init__.py
  • __main__.py
  • app.py

pyproject.toml
The pyproject.toml file configures your Briefcase project. In here you should specify the python packages which is needed by your application.
In our example you should see the following lines:

[tool.briefcase.app.wxWebcam]
formal_name = “wxWebcam”
description = “A small application to look at yourself and take an image!”
icon = “src/wxWebcam/resources/wxWebcam”
sources = [‘src/wxWebcam’]
requires =

Here, at requires = [], we need to add the python packages which is needed for our application. The packages specified here are platform independent. The packages listed here are taken from PyPi In our example we should replace it with the packages we installed in our environment (see Install Environment & Briefcase):

requires = [
    'wyPython=4.1.1',
    'numpy==1.20.2',
    'opencv-python==4.5.1.48']

It is also possible to add a wheel-packages which are not uploaded on PyPi. This is crucial if you want to add a package which you have written by yourself or which is an OpenSource Library on GitHub, but can not be downloaded from PyPi. You need to build a wheel with python (more information: Packaging Python Projects - Python Packaging User Guide) and add it to the requires option, like in the following:

requires = [
    'wyPython=4.1.1',
    'numpy==1.20.2',
    'opencv-python==4.5.1.48',
    '..\..\..\..\MyPackage\python\dist\MyPackage-0.1.0-cp38-cp38-win_amd64.whl']

Note: the python package MyPackage is in the windows home directory %userprofile% - make sure the relative path to the wheel is correct! Also, .whl packages are often platfrom dependent - thus, add it to the requires option under the platform, for Windows it would be [tool.briefcase.app.wxWebcam.windows].

Adding the application code
We are now adding our application code which you can find attached in this post.
The python code uses OpenCV to use the WebCam. OpenCV is a famous library for image processing.
The app.py file in %userprofile%/wxpython_env/scripts/wxwebcam/src/wxWebcam is not needed anymore - you can delete it.

Linux
TO-BE-DONE!

Mac
TO-BE-DONE!
1 Like

if you plan to go through with this, thanks a lot! You might consider to put this on the wiki though…

@Robin : Is there any ay I can edit my first post again? The edit button disappeared…

Hi,

in here I am going to write about a HowTo Deploy and Distribute a wxPython App with Briefcase because so far I could not find any blog post or wiki page (if so, please send a link to this topic and I will add it in the first post!).

This HowTo shall be understandable by Python Newbies and thus this HowTo is done with step-by-step instructions.

First, I just want to cover Python version 3. This is because for older Python versions I would suggest the existing tools py2exe, py2app or other tools you will find in the wxpython wiki - Creating Standalone Executables .

What is Briefcase?
Briefcase is part of the BeeWare python package, which slogan is Write once. Deploy everywhere.

According to the website, Briefcase

is a tool for converting a Python project into a standalone native application. You can package projects for:

  • Mac
  • Windows
  • Linux
  • iPhone/iPad
  • Android

However, wxPython supports the operation systems Mac, Windows and Linux - thus I will just cover these platforms.

Briefcase vs. Pyinstaller
Briefcase is a packaging tool, this means you specify the Python packages and your source code and Briefcase takes the packages with pip and your source code and bundles it to a platform native installer (in Windows it is a .msi-file). So basically everything you install in your Python environment setup is also done by Briefcase later on. Note that briefcase is using pip - so do not mess up a python environment with other distribution platforms like anaconda.
The difference to Pyinstaller is that Pyinstaller tries to freeze your current Python Environment. You have to specify hooks so that pyinstaller gets all the files your application needs.
More information about the difference between Briefcase and Pyinstaller is found here:

If you want to have support for Android and iPhone look for other GUI libraries like Toga (BeeWare’s GUI), PySide/PyQt or Kivy.

Windows
Install Environment & Briefcase
A good practice is to create a virtual environment. In this case I will use Python’s native package: venv

We will create this environment in your windows home directory with cmd.exe (python must be available in the system variables):
python -m venv %userprofile%/wxpython_env

We are going to activate the environment with cmd.exe:
cd %userprofile%/wxpython_env/scripts
activate

Now we are going to install packages which are needed for our Simple Test-GUI.
pip install numpy==1.21.2
pip install wxpython==4.1.1
pip install opencv-python==4.5.1.48
pip install beeware==0.3.0

Setup a Briefcase project
Before we write python code we need to initialize a briefcase project, thus we are typing in cmd.exe:
briefcase new

From now we have to go through the set up of briefcase. Note that the information you are going to type in is used for the package you want to deploy.
The following is an example only the last setup (GUI Framework) is important for our HowTo:
Formal Name [Hello World]: wxWebcam
App Name [wxwebcam]: wxWebcam
Bundle Identifier [com.example]: org.wxpython
Project Name [wxWebcam]: wxPython
Description [My first application]: A small application to look at yourself and take an image!
Author [Jane Developer]: Rune Monzel
Author's Email [rune@wxpython.org]: thisisnotmy@email.com
Application URL [https://wxpython.org/wxWebcam]: https://wxpython.org/
Project License [1]: 1

The GUI Frameworks must be None!
GUI Framework [1]: 3

Now we have set up briefcase. A new briefcase folder have been done in %userprofile%/wxpython_env/scripts/wxwebcam. Here we will find the folder src and four other files:

  • pyproject.toml - in here we set up the build process of briefcase. It is the most important file in briefcase. See next chapter on how to setup the pyproject.toml file.
  • LICENSE - in the example above we choosed the MIT License - you should care about Licensing
  • README.rst - in here you should write your project description - it is not visible in the deployed package
  • .gitignore - usefull .gitignore file to suppress the build / output of briefcase which should not be commited to git

In %userprofile%/wxpython_env/scripts/wxwebcam/src/wxWebcam folder we see the following files:

  • folder resources with .icns-, .ico- and .png-files
  • init.py
  • main.py
  • app.py

pyproject.toml
The pyproject.toml file configures your Briefcase project. In here you should specify the python packages which is needed by your application.
In our example you should see the following lines:

[tool.briefcase.app.wxWebcam]
formal_name = “wxWebcam”
description = “A small application to look at yourself and take an image!”
icon = “src/wxWebcam/resources/wxWebcam”
sources = [‘src/wxWebcam’]
requires =

Here, at requires = [], we need to add the python packages which is needed for our application. The packages specified here are platform independent. The packages listed here are taken from PyPi In our example we should replace it with the packages we installed in our environment (see Install Environment & Briefcase):

requires = [
    'wxPython==4.1.1',
    'numpy==1.20.2',
    'opencv-python==4.5.1.48']

Adding python packages which are not listed on PyPi
It is also possible to add a wheel-packages which are not uploaded on PyPi. This is crucial if you want to add a package which you have written by yourself or which is an OpenSource Library on GitHub, but can not be downloaded from PyPi. You need to build a wheel with python (more information: Packaging Python Projects — Python Packaging User Guide) and add it to the requires option, like in the following:

requires = [
    'wxPython==4.1.1',
    'numpy==1.20.2',
    'opencv-python==4.5.1.48',
    '..\..\..\..\MyPackage\python\dist\MyPackage-0.1.0-cp38-cp38-win_amd64.whl']

Note: the python package MyPackage is in the windows home directory %userprofile% - make sure the relative path to the wheel is correct! Also, .whl packages are often platfrom dependent - thus, add it to the requires option under the platform, for Windows it would be [tool.briefcase.app.wxWebcam.windows].

Adding the application code
We are now adding our application code which you can find attached in this post.
The python code uses OpenCV and numpy to get images from the webcam. OpenCV is a famous library for image processing.
The app.py file in %userprofile%/wxpython_env/scripts/wxwebcam/src/wxWebcam is not needed anymore - you can delete it.
Add the following files into folder %userprofile%/wxpython_env/scripts/wxwebcam/src/wxWebcam:

Add these files into folder %userprofile%/wxpython_env/scripts/wxwebcam/src/wxWebcam/resources:

Testing the application
Before we are going to deploy the package we want to test it. For this, open cmd.exe and activate your python environment:
cd %userprofile%/wxpython_env/scripts
activate
After that, go into the briefcase project folder %userprofile%/wxpython_env/scripts/wxwebcam/:
cd wxwebcam
Now we just call briefcase dev command and the application will start:
briefcase dev
In the command line you will see the output of the logging module.

Building the application
First activate the python environment or make sure it is activated and go into the briefcase project folder (see above).
To build the application we need to create & update the project, because we added the .py-file webcam.py. After that we build it with the build command:
briefcase create
briefcase update -d -r
briefcase build
Note: Now the application is builded, but not packaged!

Update build of the application
To update the application we always need to call the update and than the build command (see chapter above)!

Running the application
After the build process it is also possible to run the application with briefcase - this is the last possible debug step before we are going to test the installation.
briefcase run
Here, often the application does not start (e. g. Works in dev mode but not in run mode). In most cases this is because the required packages in the pyproject.toml are not listed! The difference between briefcase dev and briefcase run is that dev uses our python environment, while dev is using the build environment by briefcase.
If you still have problems, the best way is to package and then to debug your installed program - for more information see the debug chapter.

Packaging the application
The last step is to package the application:
briefcase package
Now, we got the package we can distribute to others: In HowTo the file is called wxWebcam-0.0.1.msi

Debugging the installed application
By double clicking to the .msi-file we will install our new application to our windows OS.
After installation, we are going to open the file location of the Program wxWebcam (go in windows, type in wxWebcam, under the icon on the right you will find Open file location).
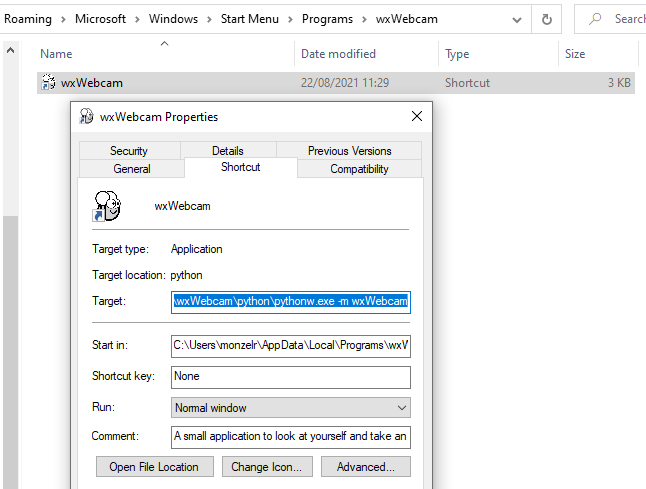
At the wxWebcam file location, by clicking right-mouse button, we are going to open the properties, like shown in the figure below:


Here, we change at Target pythonw.exe to python.exe and click Apply.
Now, when you start the application, the terminal will also open and you can debug your application. If an error occurs it will be shown in the terminal.
If your application does not start, just open the copy the command which is shown in your applications Properties Target (see Figure above), open cmd.exe and paste the command. In my case the command is:
C:\Users\monzelr\AppData\Local\Programs\wxWebcam\python\python.exe -m wxWebcam
Now, you also will see if a python import fails because a python package is missing!

That’s it! We created an application which has a size of ~80 MByte and which can be installed on a windows 10 operation system! As installed version it has size of 230 MByte. Note, that the application must be deinstalled before you want to install an updated version! See the figure below:

Linux Version will follow as soon I have installed a Linux OS - feel free to share your opinions.

Thank you so much for this guide! I have a decade-old wxPython app that I’ve wanted to distribute for some time. Being able to use this guide to deploy it as-is with briefcase without having to rewrite the entire thing in toga has been very useful for me. Although I will probably end up using toga, I can start getting my app off the ground for the meantime, and I was able to test packaging of the app, which worked perfectly thanks to your example.